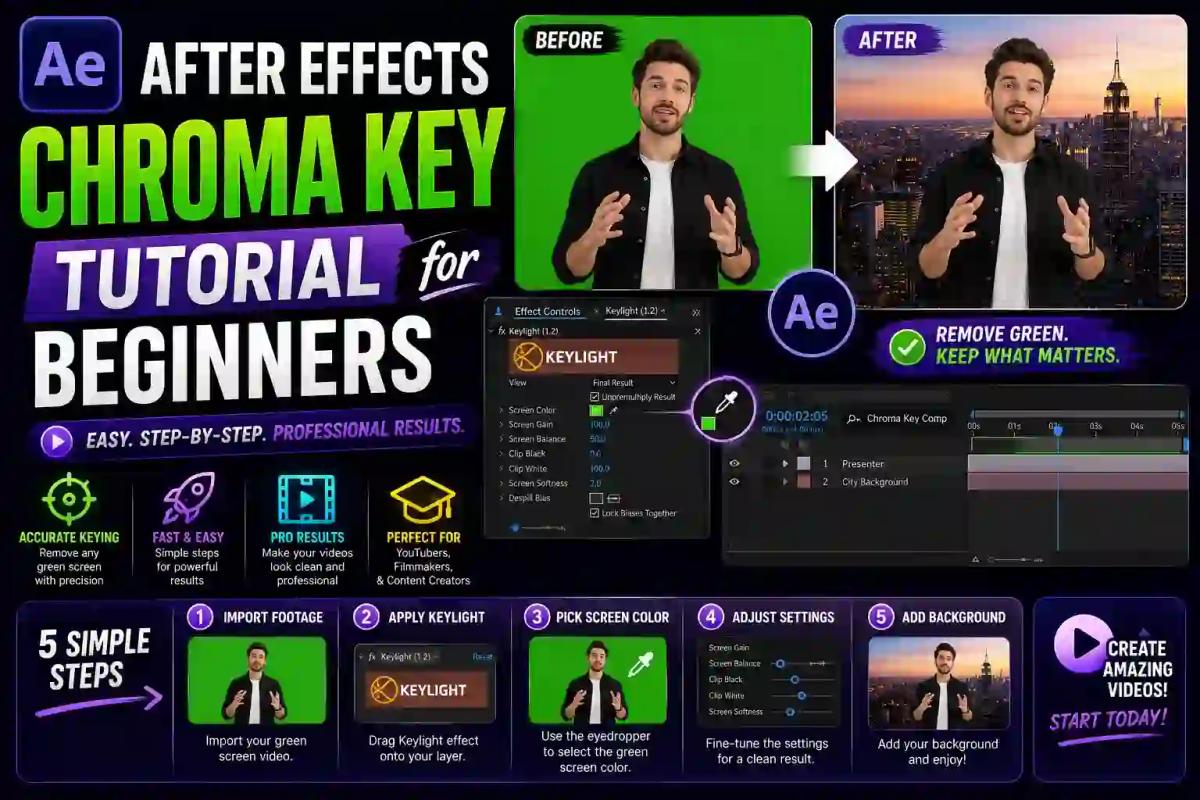
After Effects Chroma Key Tutorial for Beginners
Chroma keying is one of those skills that looks intimidating the first time you open After Effects, then suddenly clicks once you've done it two or three times. If you've ever wondered how filmmakers put a weather presenter in front of a moving satellite map, or how YouTubers drop themselves into a completely different setting, chroma key is the technique behind it.
Chroma key in After Effects is the process of removing a solid-colored background (usually green or blue) from a video clip so it can be replaced with a different image or footage. It relies on isolating one specific color value and turning every matching pixel transparent, which is why a plain, evenly lit green or blue backdrop produces the cleanest results.
This guide walks through the entire workflow, from setting up your first composition to fixing the messy edges and green spill that trip up almost every beginner. By the end, you'll know exactly which settings matter, which mistakes to avoid, and what to do when your footage simply won't key out cleanly no matter how long you fiddle with the sliders.
What Is Chroma Keying, Exactly?
Chroma keying (sometimes called color keying) works by telling your software: "find this exact color, and make every pixel that matches it invisible." Because green and blue are rarely present in human skin tones or typical wardrobe colors, they became the industry standard for backdrops. Green is more common today because digital cameras tend to capture it with slightly better clarity and less noise than blue.
According to Adobe's own documentation on keying in After Effects, keying defines transparency based on a particular color or luminance value, and any pixels sharing that value become transparent. This is different from masking, which relies on manually drawn shapes, or rotoscoping, which involves tracing a subject frame by frame. Chroma key is faster than both, but it only works well when the background color is consistent and distinct from your subject.
Why Chroma Keying Matters for Video Editors
Beginners often assume chroma key is only for big-budget productions, but it shows up constantly in everyday content:
- YouTube and course creators use it to place themselves in front of slides, screen recordings, or branded backgrounds.
- Product marketers key out backgrounds so items can be dropped onto white, transparent, or lifestyle backdrops for ads.
- News and weather segments rely on it for virtual sets and live data overlays.
- Social media editors use it for reaction videos, meme edits, and green screen TikTok trends.
- Game and film VFX artists use it to composite live-action footage into CGI environments.
Once you understand the fundamentals, the same skills transfer to Premiere Pro, DaVinci Resolve, and most other editing software, since the underlying logic (isolate a color, refine the edge, suppress spill) stays the same across tools.
What You Need Before You Start
You don't need an expensive setup to practice chroma keying, but a few basics make the process far less frustrating:
- A copy of Adobe After Effects (any recent version includes the Keylight plugin by default).
- Footage shot against a solid, evenly lit green or blue background. Wrinkled fabric or uneven lighting creates shadows that confuse the keying algorithm.
- A subject wearing colors that don't overlap with the background. Green clothing against a green screen will partially disappear.
- A replacement background image or clip ready to composite behind your keyed footage.
If your footage was shot with poor lighting or a wrinkled backdrop, After Effects will struggle no matter how carefully you adjust settings later. It's worth revisiting your shooting setup before blaming the software.
Step-by-Step: How to Chroma Key in After Effects
Here's the complete beginner workflow, based on the standard method recommended in Adobe's own keying effects documentation.
1. Import your footage and create a new composition. Open After Effects, go to File > Import, and bring in your green screen clip. Drag it onto the "New Composition" icon at the bottom of the Project panel to automatically match the composition settings to your footage.
2. Search for the Keylight preset. Open the Effects & Presets panel (Window > Effects & Presets). Type "Keylight" into the search bar. You'll typically see the combined preset labeled Keylight + Key Cleaner + Advanced Spill Suppressor, which is the recommended starting point for beginners rather than applying Keylight alone.
3. Apply the preset to your layer. Drag the preset directly onto your footage in the Timeline panel. This applies all three effects at once: Keylight for the initial key, Key Cleaner to smooth edges, and Advanced Spill Suppressor to remove leftover color fringing.
4. Select your screen color with the eyedropper. In the Effect Controls panel, click the eyedropper next to Screen Colour, then click directly on the green or blue area of your footage in the Composition panel. Pick a spot that represents the background's average color, not a shadowed or overly bright patch.
5. Switch to Screen Matte view to check your progress. Change the View dropdown to Screen Matte (or Status, depending on your version). Your subject should appear solid white, and the background should turn solid black. Gray areas indicate partial transparency, which usually means more refinement is needed.
6. Adjust Screen Gain and Screen Balance if needed. Screen Gain controls how aggressively the color is removed. Increase it carefully; pushing it too high starts eating into your subject's edges. Screen Balance rarely needs adjustment for standard green or blue screens, so leave it at default unless your footage looks unusual.
7. Fine-tune Clip Black and Clip White under Screen Matte. These sliders push near-black areas fully black and near-white areas fully white, tightening up the matte. Move them gradually. Overcorrecting creates harsh, jagged edges instead of a natural transition.
8. Draw a garbage matte to isolate your subject. Use the Pen tool to draw a rough shape around your subject, cutting out any stray background elements like light stands, uneven corners, or shadows the Keylight settings couldn't handle alone.
9. Enable Advanced Spill Suppressor. This removes the faint green or blue tint that reflects onto your subject's edges, hair, and clothing, a problem covered in more depth in the spill section below.
10. Switch back to Final Result and preview. Change the View dropdown back to Final Result. Scrub through your timeline to check the key holds up across different frames, not just the one you sampled the color from.
11. Add your new background layer and export. Place your replacement background below the keyed footage in the layer stack, preview the full composite, then export through the Render Queue or Adobe Media Encoder.
Understanding Keylight's Core Settings
New users often get overwhelmed by Keylight's long list of sliders. In reality, beginners only need to understand a handful of them to get solid results.
| Setting | What It Controls | Beginner Tip |
|---|---|---|
| Screen Colour | The exact color being keyed out | Sample from a mid-tone area of the backdrop, not a shadow or highlight |
| Screen Gain | Aggressiveness of color removal | Raise slowly; too high erodes subject edges |
| Screen Balance | Color balance correction for the key | Usually fine at default for standard green/blue screens |
Once these six settings feel familiar, the rest of Keylight's advanced controls (Screen Pre-Blur, Replace Method, Source Alpha) become easier to explore without feeling lost.
How to Create a Garbage Matte in After Effects
A garbage matte is a rough mask that removes anything outside your subject that Keylight can't cleanly handle, things like light stand shadows, uneven corners of the backdrop, or gaps where the green screen doesn't quite reach the edge of frame.
Select your footage layer in the Timeline.
Choose the Pen tool from the toolbar.
Draw a loose shape around your subject, staying a reasonable distance from the edges so you don't accidentally clip them.
Set the mask mode to "Subtract" if it's isolating the background, or "Add" if it's isolating the subject, depending on your workflow.
Feather the mask slightly (Layer > Mask > Mask Feather) so the transition doesn't look like a hard-cut rectangle.
Garbage mattes aren't meant to be pixel-precise. Their job is to remove obvious problem areas so Keylight only has to focus on the subject's actual edges.
How to Fix Green Spill in After Effects
Green spill happens when light bounces off the backdrop and lands on your subject, usually visible as a faint green tint along hair, shoulders, and the edges of glasses or jewelry. It's one of the most common complaints beginners run into, and it's rarely fixed by adjusting Keylight alone.
A few practical fixes:
- Increase the distance between your subject and the backdrop. Even three or four extra feet dramatically reduces spill, since less reflected light reaches your subject.
- Enable and adjust the Advanced Spill Suppressor included in the Keylight preset, focusing on the Spill Suppressor's Method and Desaturate sliders.
- Add a subtle color correction layer to shift skin tones back toward natural after suppression, since aggressive spill removal can leave skin looking slightly magenta.
- Use rim lighting from behind your subject during the shoot to separate them visually from the backdrop before you even get to editing.
If Keylight's spill tools aren't cutting it on a particularly tricky clip, a step-by-step breakdown in our guide on fixing green screen spill without Photoshop covers additional correction techniques worth trying.
Keylight vs. Color Range vs. Linear Color Key: Which Should Beginners Use?
After Effects includes several keying effects, and it's not always obvious which one fits your footage.
| Method | Best For | Beginner Friendliness |
|---|---|---|
| Keylight | Standard green/blue screen footage with even lighting | High — the industry-standard starting point |
| Color Range | Footage with multiple similar shades to remove, or non-standard colors | Medium — more complex controls |
| Linear Color Key | Quick, rough keys on simple, high-contrast footage | Low precision, but very fast for testing |
For nearly all beginner projects, Keylight is the right starting point. Color Range becomes useful when your background has color variation (like uneven lighting creating multiple shades of green), and Linear Color Key is mostly useful for quick previews rather than final output.
Common Beginner Mistakes When Chroma Keying
Most beginner keying problems trace back to a handful of repeated mistakes:
- Sampling the screen color from a shadowed or overexposed spot, which produces an inaccurate initial key.
- Pushing Screen Gain too high, which eats into fine details like hair strands or fingers.
- Skipping the garbage matte entirely, leaving stray background elements visible.
- Ignoring spill suppression, resulting in a faint green or blue tint around the subject's edges.
- Using footage with wrinkled or unevenly lit backdrops, which no amount of Keylight adjustment can fully fix.
- Forgetting to preview across the entire clip, since lighting shifts frame to frame can break a key that looked fine on a single still.
Catching these early saves significant time compared to troubleshooting a finished composite that looks slightly off for reasons that aren't immediately obvious.
Tips for Shooting Better Green Screen Footage
Editing can only fix so much. A well-shot green screen clip is dramatically easier to key than a poorly lit one, regardless of how skilled you are with Keylight.
- Light the backdrop evenly, ideally with two lights angled at 45 degrees to avoid hot spots and shadows.
- Keep your subject at least four to six feet from the backdrop to reduce spill and shadow.
- Avoid wearing colors close to your backdrop color, including green jewelry, blue lanyards, or patterned clothing with similar tones.
- Use a matte (non-reflective) backdrop fabric rather than glossy material, which bounces light unevenly.
- Shoot in a higher bitrate or less compressed format when possible, since heavy compression destroys the fine color data Keylight relies on.
What to Do When After Effects Can't Get a Clean Key
Sometimes, no amount of manual adjustment produces a clean result. This usually happens with fine hair detail, semi-transparent objects like glass or smoke, heavily compressed footage, or backdrops with visible wrinkles and shadows.
In these cases, it's often faster to skip extensive manual keying inside After Effects and use a dedicated tool built specifically for accurate edge detection. Our green screen remover is designed to handle exactly these harder cases, producing a clean, ready-to-composite result without hours of manual slider adjustments. For photo-based background removal on stills rather than video, the AI background remover works the same way for complex edges like hair and fur.
If you're specifically dealing with low-quality or compressed source footage, our guide on removing a background in HD quality without pixelation explains what causes those artifacts and how to avoid them before they end up baked into your final export.
Free vs. Paid Options for Green Screen Removal
Not everyone editing green screen footage has access to After Effects, and that's fine. There are legitimate free and paid alternatives depending on your workflow:
- After Effects (paid, Adobe subscription): The most powerful and flexible option, especially for complex composites, multi-layer projects, or professional VFX work.
- CapCut (free, mobile and desktop): A faster, simplified option for social content creators who don't need Keylight's full control. Our CapCut green screen removal tutorial covers the mobile-friendly workflow step by step.
- Free online tools: For quick, one-off clips without installing software, our roundup of the best free green screen removers online compares several options by accuracy and speed.
If you're weighing whether to stick with a manual tool like Photoshop or After Effects versus a dedicated automated remover, our comparison of Photoshop vs. RemoverHub for transparent images breaks down where each genuinely performs better.
A Practical Example: Compositing a Simple Product Demo
Say you've filmed a short clip of yourself holding a product in front of a green screen, and you want to place it over a branded background for a promo video. After importing the footage and applying the Keylight preset, you sample the screen color, switch to Screen Matte view, and notice the subject isn't fully white; there's a gray patch near the shoulder where lighting was slightly uneven.
Rather than cranking Screen Gain (which would start eating into the product's edges), you draw a small garbage matte around that specific shoulder area and nudge Clip Black slightly. After enabling Advanced Spill Suppressor to remove the faint green tint along your arm, the key holds cleanly across the full clip. This is a realistic beginner scenario: most keying problems are solved with small, targeted adjustments rather than one dramatic slider change.
Frequently Asked Questions
What is chroma keying in After Effects? Chroma keying is the process of removing a specific color, usually green or blue, from footage so it becomes transparent and can be replaced with a different background. After Effects handles this primarily through the Keylight effect.
How do you use Keylight in After Effects? Apply the Keylight + Key Cleaner + Advanced Spill Suppressor preset to your footage, sample the background color with the eyedropper tool, then refine the result using Screen Gain, Clip Black, and Clip White while checking the Screen Matte view.
Why is my green screen not keying out properly? This usually comes down to uneven lighting, a wrinkled backdrop, heavily compressed footage, or sampling the screen color from a shadowed area. Reshooting with better lighting often solves the problem faster than adjusting settings endlessly.
How do I fix green spill in After Effects? Enable the Advanced Spill Suppressor included in the Keylight preset, increase the distance between your subject and the backdrop during filming, and consider adding a light correction layer afterward to restore natural skin tones.
What is the best plugin for chroma key in After Effects? Keylight, included by default in After Effects, is considered the industry standard and is recommended by Adobe as the primary tool for professional-quality color keying.
Can you chroma key without a green screen? It's possible using Color Range or Difference Matte on footage with a plain, consistent background, but results are far less reliable than using a proper green or blue screen with even lighting.
Is Keylight free in After Effects? Yes. Keylight ships with every standard After Effects license at no additional cost, and no separate plugin purchase is required.
Final Thoughts
Chroma keying in After Effects is a skill that rewards patience more than raw technical knowledge. Once you understand what Screen Gain, Clip Black, and spill suppression actually do, the rest becomes a process of small, deliberate adjustments rather than guesswork. Good lighting and a well-prepared backdrop will save you more editing time than any Keylight setting ever will.
If you're working with footage that's giving you trouble no matter how much you refine it, whether it's fine hair detail, a wrinkled backdrop, or heavy compression, running it through a dedicated tool built for accurate edge detection is often the faster path to a clean result. Try our green screen remover to get a polished, ready-to-composite clip without the manual slider work, or explore the full RemoverHub toolkit for related editing tasks like sharpening, watermark removal, and transparent image creation.